# API Miner Quickstart
There are two options for quickstart:
- Using the
curlcommand line tool, which is commonly already installed on many systems. - Using the Postman HTTP client.
# Using cURL
# cURL Prerequisites
curl is used in a terminal, so some familiarity with running a command line
terminal is needed. All commands in this curl section are intended to be
typed into a terminal.
You'll need curl itself installed. You can test to see if it's already
installed by running:
curl --version
If it's not installed, install it using the appropriate installation method for your system:
- Linux
- Debian and derivatives:
sudo apt-get install curl - Arch and derivatives:
pacman -S curl - Fedora:
yum install curl
- Debian and derivatives:
- Mac OS X
- If you don't have it, first install Homebrew (opens new window)
- Then run
brew install curl
- Windows
- NOTE! The curl commands in this quickstart won't work in Windows' cmd or PowerShell terminals without modification. We recommend using Postman, or some other REST client.
- Download the curl binary here (opens new window) and add it to your PATH.
# Using jq (optional)
If your system has jq installed (or you can always install it
from here (opens new window)), you can use it to make the JSON
output easier to read. Simply add | jq at the end of every command.
# 1. List accounts
You should've already received the address of your first Ethereum account on API Miner, but as the first step we'll go ahead and list all of our accounts.
curl -X GET \
    https://apiminer.blockwell.ai/accounts \
    -H 'Authorization: Bearer apiminertestauth'
As mentioned earlier, copy and paste the curl command to your terminal. Make sure you get the whole command, as it's split on multiple lines for easier reading.
The response will look like this, except it will be unformatted if not using jq:
{
  "data": [
    {
      "id": "decd1dd0-4b24-4f1b-86fd-e0479d8ca3a6",
      "address": "0xd684ea9d172552e28ca8dfe4d9d39b49180741e7",
      "owner": "67fe8cbc-b165-4100-aa0c-03b029fabe77",
      "defaultAccount": true
    }
  ]
}
The id is the globally unique identifier of this account, and the address
is the Ethereum address of the account. You'll need the address for some of
the quickstart steps.
# 2. Getting Pump tokens
Next, call the mint function on the Pump token smart contract to get
yourself some tokens.
Use the following:
curl -X POST \
    https://apiminer.blockwell.ai/contracts/54ccdb8a-8177-4bbf-8a3a-1af38be82a33/send/mint \
    -H 'Authorization: Bearer apiminertestauth' \
    -H 'Content-Type: application/json' \
    -d '{
        "arg": [
        "0xd684ea9d172552e28ca8dfe4d9d39b49180741e7",
        "100000000000000000000"
        ]
    }'
The response will look like this:
{
  "data": {
    "id": "0d3a809f-f832-4de1-9839-7b8b767ee9b6",
    "type": "contract-method",
    "contractId": "54ccdb8a-8177-4bbf-8a3a-1af38be82a33",
    "from": "0xd684ea9d172552e28ca8dfe4d9d39b49180741e7",
    "method": "mint",
    "parameters": [
      "0xd684ea9d172552e28ca8dfe4d9d39b49180741e7",
      "100000000000000000000"
    ],
    "status": "new",
    "created": "2020-08-27T23:48:58.634Z",
    "network": "rinkeby"
  }
}
Since transactions on the blockchain take some time, the API doesn't wait for it to finish, it just gives you the info you submitted and an ID you can use to refer to it later.
# 3. Getting the status of a transaction
To see what happened to the transaction from the previous step, use the following with:
<id>replaced with the transaction ID you received in the previous step.
curl -X GET \
    https://apiminer.blockwell.ai/transactions/<id> \
    -H 'Authorization: Bearer apiminertestauth'
The transfer should be completed within 15 seconds, after which you'll see the following response:
{
  "data": {
    "id": "0d3a809f-f832-4de1-9839-7b8b767ee9b6",
    "type": "contract-method",
    "contractId": "54ccdb8a-8177-4bbf-8a3a-1af38be82a33",
    "from": "0xd684ea9d172552e28ca8dfe4d9d39b49180741e7",
    "method": "mint",
    "parameters": [
      "0xd684ea9d172552e28ca8dfe4d9d39b49180741e7",
      "100000000000000000000"
    ],
    "status": "completed",
    "created": "2020-08-27T23:48:58.634Z",
    "submitted": "2020-08-27T23:49:10.112Z",
    "ended": "2020-08-27T23:49:23.520Z",
    "transactionHash": "0x0826cd738abd10fa815f488107c47e367349698a891eeabeb379ecaeac835662",
    "blockNumber": 7094422,
    "events": ["..."],
    "network": "rinkeby"
  }
}
The status showing completed means the call was successful.
# 4. Getting your token balance
To double check that you did actually get the Pump tokens, use:
curl -X GET \
    https://apiminer.blockwell.ai/tokens/54ccdb8a-8177-4bbf-8a3a-1af38be82a33/balances/default \
    -H 'Authorization: Bearer apiminertestauth'
This will get the token balance for token ID 54ccdb8a-8177-4bbf-8a3a-1af38be82a33 -
which is the Pump token - for your default account.
The response is as follows:
{"data":"100000000000000000000"}
# 5. Creating an Ethereum account
To create a new Ethereum account, use:
curl -X POST \
    https://apiminer.blockwell.ai/accounts \
    -H 'Authorization: Bearer apiminertestauth'
The response is as follows:
{
  "data": {
    "id": "370fb7ab-f589-478f-aa1c-d59f775b1583",
    "address": "0x5aabd741e0adc7915aa540d75fd49c7b4f953bfb",
    "owner": "67fe8cbc-b165-4100-aa0c-03b029fabe77",
    "defaultAccount": false
  }
}
Note that this new account is not your default account, so it will only be used if you specify it in the API calls. We'll look at how to do that below.
# 6. Transferring tokens
To transfer 2 PMP tokens from your default account to the newly created one, use:
<address>replaced with the address of your second account you just created.
curl -X POST \
    https://apiminer.blockwell.ai/tokens/54ccdb8a-8177-4bbf-8a3a-1af38be82a33/transfers \
    -H 'Authorization: Bearer apiminertestauth' \
    -H 'Content-Type: application/json' \
    -d '{
        "to": "<address>",
        "value": "2000000000000000000"
    }'
The response is as follows:
{
  "data": {
    "id": "e052bd11-d899-4444-814b-d179444e6b9d",
    "type": "contract-method",
    "contractId": "54ccdb8a-8177-4bbf-8a3a-1af38be82a33",
    "from": "0xd684ea9d172552e28ca8dfe4d9d39b49180741e7",
    "method": "transfer",
    "parameters": [
      "0x5aabd741e0adc7915aa540d75fd49c7b4f953bfb",
      "2000000000000000000"
    ],
    "status": "new",
    "created": "2020-08-27T23:51:54.964Z",
    "network": "rinkeby"
  }
}
As before, the response refers to a transaction, rather than the result of the transfer. Refer to step 3 to check on the status of the transaction.
# 7. Get the token balance of another account
In step 4 we retrieved the balance of your default account, but you can also query the balance of any other account by their address.
To check the balance of your second account, use:
<address>replaced with the address of your second account.
curl -X GET \
    https://apiminer.blockwell.ai/tokens/54ccdb8a-8177-4bbf-8a3a-1af38be82a33/balances/<address> \
    -H 'Authorization: Bearer apiminertestauth'
The response is as follows:
{
  "data": "2000000000000000000"
}
# 8. Return half of the tokens
To demonstrate sending tokens from a non-default account, we'll send half of the tokens back. Use:
<new-address>replaced with the address of your new account.
curl -X POST \
    https://apiminer.blockwell.ai/tokens/54ccdb8a-8177-4bbf-8a3a-1af38be82a33/transfers \
    -H 'Authorization: Bearer apiminertestauth' \
    -H 'Content-Type: application/json' \
    -d '{
        "from": "<new-address>",
        "to": "0xd684ea9d172552e28ca8dfe4d9d39b49180741e7",
        "value": "1000000000000000000"
    }'
The response is as follows:
{
  "data": {
    "id": "611d145a-840a-425e-997b-196e57cae83c",
    "type": "contract-method",
    "contractId": "54ccdb8a-8177-4bbf-8a3a-1af38be82a33",
    "from": "0x5aabd741e0adc7915aa540d75fd49c7b4f953bfb",
    "method": "transfer",
    "parameters": [
      "0xd684ea9d172552e28ca8dfe4d9d39b49180741e7",
      "1000000000000000000"
    ],
    "status": "new",
    "created": "2020-08-27T23:56:08.531Z",
    "network": "rinkeby"
  }
}
As before, refer to step 3 to get the status of the transaction.
# Using Postman
# Postman Prerequisites
You'll need Postman (opens new window) installed, follow their documentation for installation.
Download the Postman collection for API Miner:
API Miner collection (opens new window)
After installing, import the collection:

Under Import File click Choose Files and find the apiminer-collection.json
file you downloaded, or drag and drop it to where it says "Drop files here".
Next, create a new Postman environment by clicking the gear icon:

In the top-right corner. Click the Add button, and configure the new environment as follows:
- token:
apiminertestauth - contractId:
54ccdb8a-8177-4bbf-8a3a-1af38be82a33
For the name you can enter anything you want, it's for your own reference.
You can now use the API Miner collection to make calls to the API.
TIP
If you want to use a different API Miner environment than the default
apiminer.blockwell.ai, you can add another variable called host with
the hostname of the environment to use.
# 1. List accounts
You should've already received the address of your first Ethereum account on API Miner, but as the first step we'll go ahead and list all of our accounts.
Find the "GET List accounts" endpoint, and click Send
![]() .
.
You'll see a response like this:
{
  "data": [
    {
      "id": "decd1dd0-4b24-4f1b-86fd-e0479d8ca3a6",
      "address": "0xd684ea9d172552e28ca8dfe4d9d39b49180741e7",
      "owner": "67fe8cbc-b165-4100-aa0c-03b029fabe77",
      "defaultAccount": true
    }
  ]
}
The id is the globally unique identifier of this account, and the address
is the Ethereum address of the account. You'll need the address for some of
the quickstart steps.
IF YOU'RE CURIOUS
The owner value shows the ID of the user that owns the account, so it will
show your user ID. defaultAccount indicates if the account will be the one
used by default when submitting transactions without specifying an account.
# 2. Getting Pump tokens
Next, use the "POST Contract send call" endpoint to call the token contract with the token minting function.
Under Params find the method Path Variable, and give it the value mint.

Use the following Body with:
<address>replaced with your account address from the first step.
{
    "arg": [
        "0xd684ea9d172552e28ca8dfe4d9d39b49180741e7",
        "100000000000000000000"
    ]
}
Then click Send
![]() .
.
The response will look like this:
{
  "data": {
    "id": "0d3a809f-f832-4de1-9839-7b8b767ee9b6",
    "type": "contract-method",
    "contractId": "54ccdb8a-8177-4bbf-8a3a-1af38be82a33",
    "from": "0xd684ea9d172552e28ca8dfe4d9d39b49180741e7",
    "method": "mint",
    "parameters": [
      "0xd684ea9d172552e28ca8dfe4d9d39b49180741e7",
      "100000000000000000000"
    ],
    "status": "new",
    "created": "2020-08-27T23:48:58.634Z",
    "network": "rinkeby"
  }
}
Since transactions on the blockchain take some time, the API doesn't wait for it to finish, it just gives you an ID that you can use to refer to it later.
IF YOU'RE CURIOUS
In addition to the id, there are several fields as part of the response.
You can read more about each field in the
API Spec (opens new window), just scroll
down to the Responses and click data to show the fields.
# 3. Getting the status of a transaction

To see what happened to the transaction from the previous step, use the
"POST Get a transaction" endpoint. Under Params, Path Variables, set the value
of id to the id from the mint response.
The transfer should be completed within 15 seconds, after which you'll see the following response:
{
  "data": {
    "id": "0d3a809f-f832-4de1-9839-7b8b767ee9b6",
    "type": "contract-method",
    "contractId": "54ccdb8a-8177-4bbf-8a3a-1af38be82a33",
    "from": "0xd684ea9d172552e28ca8dfe4d9d39b49180741e7",
    "method": "mint",
    "parameters": [
      "0xd684ea9d172552e28ca8dfe4d9d39b49180741e7",
      "100000000000000000000"
    ],
    "status": "completed",
    "created": "2020-08-27T23:48:58.634Z",
    "submitted": "2020-08-27T23:49:10.112Z",
    "ended": "2020-08-27T23:49:23.520Z",
    "transactionHash": "0x0826cd738abd10fa815f488107c47e367349698a891eeabeb379ecaeac835662",
    "blockNumber": 7094422,
    "events": ["..."],
    "network": "rinkeby"
  }
}
The status showing completed means the call was successful.
# 4. Getting your token balance
To double check that you did actually get the Pump tokens, use the "GET Default account balance" endpoint.

No parameter changes are needed, just hit Send
![]() .
.
The response is as follows:
{"data":"100000000000000000000"}
TIP
Ethereum doesn't support decimals, so instead it's just a really big number. To get the value with decimals, you divide it:
The divisor is 1e18, or in other words 1 followed by eighteen 0's. The 18
is arbitrary, but it's what ETH and most tokens use. If you're dealing with
a token using a different number of decimals, just use that number instead
of 18. The raw value is often also called "Wei".
That means we just minted 100 tokens to ourselves.
# 5. Creating an Ethereum account

To create a second Ethereum account, use the "POST Create account" endpoint.
No parameter changes are needed, just hit Send
![]() , and you'll see a
response like this:
, and you'll see a
response like this:
{
  "data": {
    "id": "370fb7ab-f589-478f-aa1c-d59f775b1583",
    "address": "0x5aabd741e0adc7915aa540d75fd49c7b4f953bfb",
    "owner": "67fe8cbc-b165-4100-aa0c-03b029fabe77",
    "defaultAccount": false
  }
}
Note that this new account is not your default account, so it will only be used if you specify it in the API calls. We'll look at how to do that below.
# 6. Transferring tokens
To transfer 2 PMP tokens from your default account to the newly created one, use the "POST Transfer tokens" endpoint.
In Body, change the to address to match the second account's address you
created in the previous step:
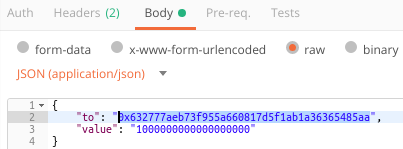
Then change value to 2000000000000000000:

Then hit Send. The response is as follows:
{
  "data": {
    "id": "e052bd11-d899-4444-814b-d179444e6b9d",
    "type": "contract-method",
    "contractId": "54ccdb8a-8177-4bbf-8a3a-1af38be82a33",
    "from": "0xd684ea9d172552e28ca8dfe4d9d39b49180741e7",
    "method": "transfer",
    "parameters": [
      "0x5aabd741e0adc7915aa540d75fd49c7b4f953bfb",
      "2000000000000000000"
    ],
    "status": "new",
    "created": "2020-08-27T23:51:54.964Z",
    "network": "rinkeby"
  }
}
As before, the response refers to a transaction, rather than the result of the transfer. Refer to Step 3 to check on the status of the transaction.
# 7. Get the token balance of another account
In Step 5 we retrieved the balance of your default account, but you can also query the balance of any other account by their address.
To check the balance of your second account, use the "GET Token balance" endpoint.

In Params, set the address value to match your second account's address.
Hit Send. The response is as follows:
{
    "data": "2000000000000000000"
}
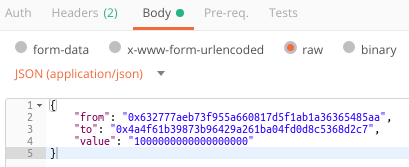
# 8. Return half of the tokens
To demonstrate sending tokens from a non-default account, we'll send half of the tokens back, again using "POST Transfer tokens".
This time, replace the Body with the following:
<new-address>replaced with the address of your second account.
{
    "from": "<new-address>",
    "to": "0xd684ea9d172552e28ca8dfe4d9d39b49180741e7",
    "value": "1000000000000000000"
}
Like this:
Hit Send. The response is as follows:
{
    "data": {
        "id": "e3981e4b-d31e-47f4-862e-ccdb3b39ccce",
        "status": "new",
        "created": "2018-08-15T19:32:33.153Z"
    }
}
As before, refer to Step 3 to get the status of the transaction.